


.png)


.png)


AI-Powered Key Takeaways


Table of Contents
I am the founder of this consulting firm called CloudGrey, where we focus on mobile automation and helping clients get their mobile automation strategy going and whether they should use Appium or something else, training teams, stuff like that. I also work with the Appium open source project and have been involved with that since the beginning.
Execute Driver Script
The first topic that I want to cover today is something that’s a new feature in Appium called executeDriverScript, and it sounds a lot like execute script which you might know as a feature from Selenium and Appium in web mode. This is something a little bit different. So, first let’s talk about the problem this feature is trying to solve.
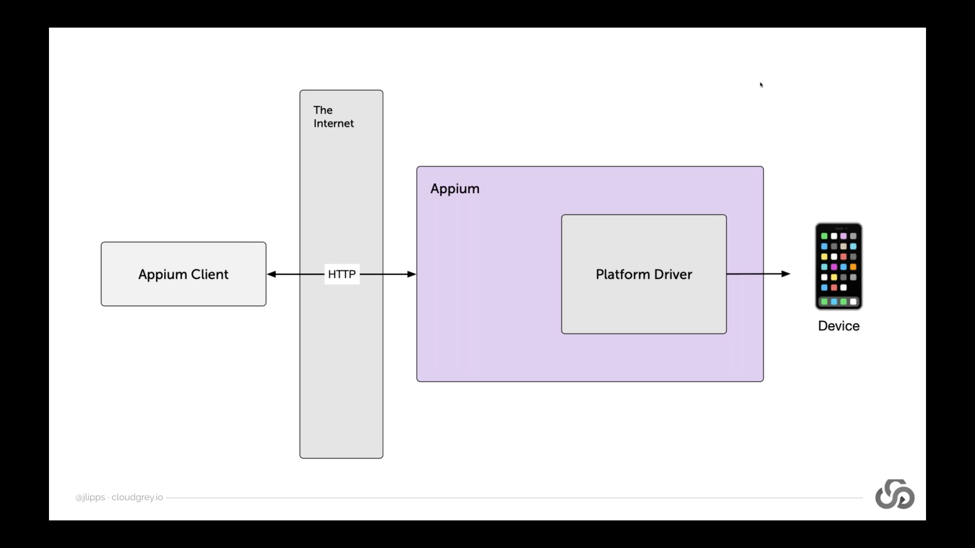
As a bit of background, we can remember that Appium is built around something called the client-server architecture. If we take a look at this diagram here, what client-server architecture means is that the part of Appium which is actually automating devices, physically connected to a device, is not necessarily located in the same place as your test code. When you’re writing Appium test code, you’re importing an Appium client into your favorite programming language and writing commands like driver.findElement or whatever.
But what’s actually happening under the hood when you run those commands in your programming language is that those commands are turned into HTTP requests and sent to an Appium server, which is running somewhere on a network that’s accessible to you. It might be on your local network. If you’re running Appium locally, you don’t really notice very much that Appium might be far away, because it’s not. It’s in the same place as your test script, but Appium might be running somewhere on the other side of the world from your test script.
Because Appium has this client-server architecture, Appium servers can be located anywhere in the world as long as you can send an HTTP request to them, and this provides a ton of benefits. This client-server architecture is great for a lot of reasons. It means that you can have clients written in any different language, but they all speak to the server which is just a single implementation of a sort of rest API which can receive commands, doesn’t have to be written in all of these different languages. You can talk to Appium servers around the world, which might be nice because those Appium servers might be connected to devices around the world – devices that you don’t have access to locally, and yet you can still write and run your test script locally on your machine without having to zip it up and send it somewhere.
There’s a lot of really great benefits to this architecture, but it does have some downsides as well. One of the things we can observe is that every Appium command, because of this client-server architecture, is a separate HTTP request.
This isn’t a big deal when you’re running your tests against an Appium server that’s running locally, because HTTP requests over the local interface are basically instant. There’s a bit of time that it takes of course, but it’s basically instant. So, you don’t really notice any problems there, but imagine if the Appium servers across the world. Now every command that you execute in your test script is triggering an HTTP request that’s having to traverse the global internet all the way around the world, which can be a bit time-consuming.
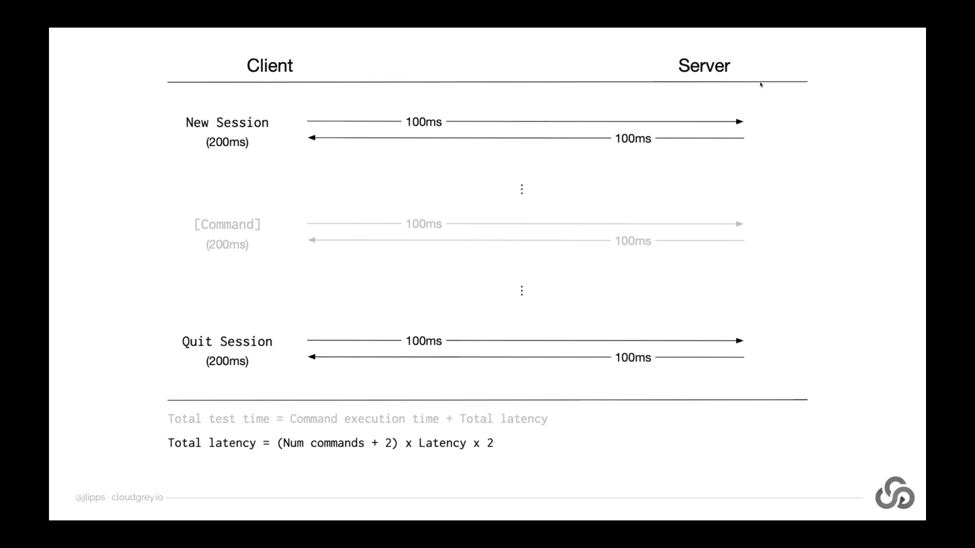
Let’s take a look at this in a little bit more detail. What this diagram is showing is a sort of timeline from top to bottom of an Appium test which usually takes place within the course of a single Appium session. So in any Appium test, you typically have a new session call which starts up the device or simulator or whatever that you’re working with, and then at some point you have a quit session call.
So those are always there in any given test, but then in between those two you might have any number of commands. You might have two commands. You might have 200 commands. It all depends on what you’re trying to accomplish in your test. Now the thing that this diagram is pointing out, is that for each of these, your client is sending a network request to the Appium server, and then the server is sending a response back.
Now if we imagine that the server is somewhere far away from you, or if you have particularly slow internet, or if the packets have to route through a particularly slow path, then you might be looking at a decent amount of time for each of these requests and responses to take place. Maybe let’s say a hundred milliseconds as an arbitrary guess. I think from where I’m sitting in Vancouver to let’s say Tokyo, Japan, average latency, kind of base latency, would be something like 90 milliseconds. So we could imagine that this might be a real-world example of me running a test against an Appium server in Tokyo.
So what we observe from all this is that if we want to figure out our total test time, we obviously have to factor latency into the equation. It’s not just the time that the Appium server takes to execute the command, it’s also the time that it takes her client to send the command and the time that the Appium server takes to send the response back to the client.
So that total latency we could formulate with this little schema that I have down at the bottom. Total latency equals the number of test commands or test steps plus 2. Plus 2 because we always have the new session and the quit session, so those aren’t counted as test steps. Those are kind of boilerplate the things that are apart of every single session, because then you have your number of actual test commands.
Each of those is multiplied by the latency that exists. I should say average latency, really, that exists between the client and server, and then x2 because we have both a request and a response of course.
So let’s take a look at what that would look like with an example in practice. So here’s the formula specified again using something that looks like code. I guess this would be like PHP code or something like that, but hopefully you can understand it. If we substitute actual numbers for these variables here, like let’s use the figure of 90 milliseconds, or that this 90 here is the number of commands that are occurring in my test, so that’s the number of commands. So total we have 92 commands that are going back and forth across the network, and let’s say we have a latency of a hundred milliseconds for each direction of each command. Then what we see is that the latency, or I should say time lost due to latency or the total latency of our test, is 18.4 seconds. So 18,400 milliseconds. 18.4 seconds.
This is a fair amount of time we’ve lost just due to latency in our test. This is time that our Appium server isn’t doing anything. Client isn’t doing anything. It’s just data passing over the wire. So if you multiply this number by the number of tests in your build, if you’ve got a hundred tests, that’s now 1,840 seconds. If you divide that by 60, you get the number of minutes that you’ve wasted in your bill just due to latency.
Obviously wasted is a strong term. Part of this is just a fact of life and you might be fine with it, but it’s something that we can optimize, and that’s what the point of this executeDriverScript feature is, which I’m coming to describe here pretty soon.
Other than just adding time to your build, network latency can also lead to unreliability. Imagine you have a test where there is a bunch of interaction happening within your application, and that interaction is fairly fast and fairly time-dependent. So, this is especially true in apps like games where speediness is very important. If you’re trying to play a game, if you wait two seconds too long to tap a button or an object – that object might not even be there anymore. If you now imagine trying to automate playing that game with Appium, you can see that time loss due to latency isn’t just time that you wasted. It could also be time that prevents your test from actually succeeding.
So this is one reason that the authors of the Webdriver API decided to do something pretty unique with the touch actions API in the new version of the Webdriver protocol. Where instead of sending each action one at a time like put the finger here and then press it down and then swipe it here and then do something else with it. If each of those individual components of the action were sent over the network, there would be no guarantee as to when they would happen in relation to one another, because network latency is there. Sometimes requests take longer than other times. Sometimes there’s internet weather. All this kind of stuff.
So, that API allows grouping of a bunch of different actions together that are then kind of unpacked and executed on the server which is local to the device, and therefore can ensure that things are happening with a very precise amount of time in between them.
So, what executeDriverScript is is basically an attempt to do this for all Appium commands. Not just actions, but any command that you can think of. It’s essentially a way of grouping commands together to work around latency or batching them together. You could think about it as creating a batch of commands which all get executed on the server rather than being sent over the network one at a time. So how does this command work? Well, if you are using the Java client, it looks like calling driver.executeDriverScript. Of course, depending on the language you use, this might look a little different to you and you’ll have to refer to the documentation to see the command in your favorite language. It’ll look something like this: driver.executeDriverScript.
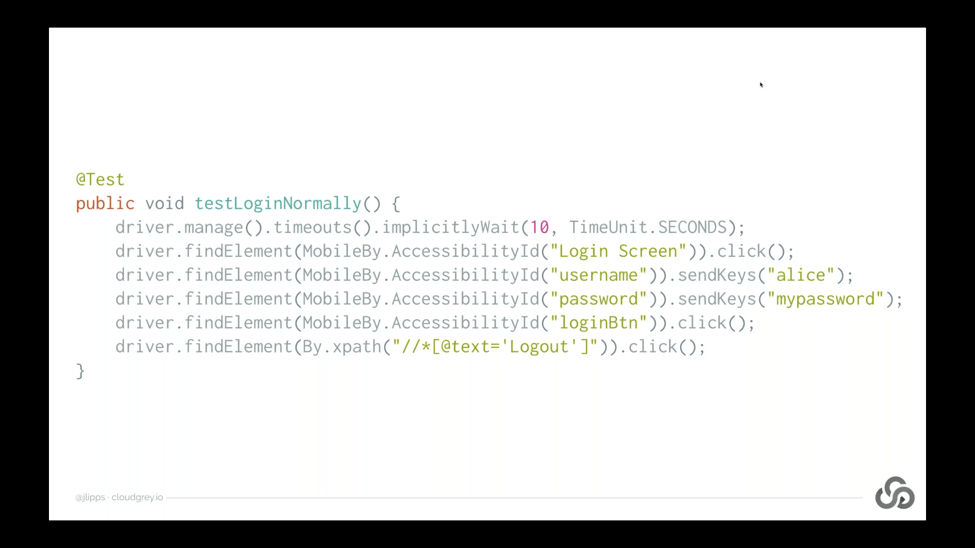
How do we use this in practice? Well, let’s first take a look at a very simple test that’s written without this feature. So this is a test of login in my silly little test app that I have, where we’re first setting an implicit wait time out, because we’re lazy and don’t want to use explicit wait, so we’re using an implicit wait. Then we’re finding these different elements by accessibilityID and interacting with them using the standard Appium Webdriver API driver.findElement, and then we’re clicking driver.Findelement, and then we’re sending keys.
So we’re filling out a username and a password, clicking the login button, and then asserting that we see the log out text to prove that we actually logged in successfully. So this is how we would normally write this test without using executeDriverScript. What if we wanted to batch all of these commands together? So then instead of being executed one at a time and waiting for the request and the response to occur for each of these, what if we group them together?
Let’s remember that it’s not just the six or so lines here, but it actually is almost double that in terms of the number of commands that we’re running – so finding an element is a command, click as a command, and so on. So we’ve actually got about eight or nine or ten different commands represented here.
So if we wanted to group all these together, we could use executeDriverScript like so. Basically calling driver.executeDriverScript, and putting all of what looks like code into basically one long string. So what’s going on here? Let’s have a look at this with a reference to the previous code that we just saw: the normal method. So what we have is basically how each of the lines in the normal method is now represented by a different line within our string here. So instead of saying driver.manage.timeouts.iimplicitlyWait, we are saying await driver.SetImplicitTimeout. So if you know the Webdriver API, you can read this code within this string here and immediately see this is just Webdriver code.
Now you might not know what this word await means, you might not know what this dollar sign function is doing, and why there’s a tilde character in front of the accessibility IDs. That might seem a little opaque to you, but if you know how to write Appium tests in any language, you could probably look at this and say what’s happening here is we’re encoding a whole set of steps, a whole multitude of commands in one string. Basically you can do it in JavaScript when you call the eval function. You can put a bunch of JavaScript in a string and then evaluate it all in one go. That’s actually more or less what’s happening here. This is actually JavaScript code that we’ve written in this string. It’s not just JavaScript code, but it’s code that’s written with access to a driver object, and this driver object comes from the Webdriver I/O library.
Execute Driver Script Allows Remote Running of a WebdriverIO Script
So, executeDriverScript is basically a method that allows you to remotely execute a WebdriverIO script – just written as a single string. If you’ve never heard of WebdriverIO, it’s probably the best Webdriver client for JavaScript, and it supports selenium. It supports Appium. It’s very well maintained. I’ve made a few contributions to it myself. It’s a great project, really fun to work with, and a lot of people use it to write their test automation code.
Basically if you wanted to know about what does this dollar sign function mean? What does this tilde mean? You would go to the WebdriverIO documentation and APIs and learn about that. Just to share – since we’re on this screen – what they do mean the dollar sign function is essentially the findElement call, just a little more concise, and the tilde in front of a string means use the accessibilityID locator strategy. So instead of having separate strategies and selectors in the WebdriverIO API, they’re all kind of mashed together into one string, and the Webdriver I/O Library kind of intelligently looks at the shape of the string and decides what locator strategy to use.
For accessibilityID the kind of magic first character is this tilde, where as you can see in the XPath query, because we start with two forward slashes, the library is able to detect that that’s an XPath locator strategy without us having to specify that explicitly.
We also have this await keyword. That’s because in JavaScript, we are dealing with promises and a weight is a way of kind of waiting for the results of a promise and on wrapping it without having to kind of mess with promises in their native way. It lets us write cleaner code. We’ve got two awaits here on each of the lines, because we’re actually running two commands: one for finding and one for clicking. There might be a more elegant way to write this. This is the first way that occurred to me and that works using the WebdriverIO Library.
Why Javascript?
So, that’s a little bit about WebdriverIO, but we can step back and actually ask why JavaScript? Why use JavaScript in the first place? The answer is that Appium itself is written in JavaScript, so executing this code on the server side was more or less trivial, because we had access to the WebdriverIO API natively from within node.js (which is what Appium runs on). Also, a lot of people use this library. Most people have some familiarity with JavaScript, even if they don’t with other languages and we like, on the Appium team, doing things in JavaScript. Sometimes it bothers some people, but we’ve been fairly successful by sticking with JavaScript, so it seemed like a good idea.
You might also be thinking: wait a second, every time I’ve written JavaScript or read anything about JavaScript, I’ve always heard to never put code in strings and evaluate it blindly. That’s actually really good advice, because what we’re enabling here through this feature is essentially a kind of remote code execution, which is always risky if you allow your users to wrap up arbitrary code and run it in another context. Who knows what kinds of clever and dastardly things they might do? So this is taken for granted. This is true.
Because there is a fundamental concern about security (because we never know what somebody might be able to do), to use this feature in your Appium server, you actually have to start the server with a special flag. This is a new flag that has been introduced recently: the allow-insecure flag, where you can give a special label to tell Appium to turn a feature on which is not on by default. So if you’re running an Appium server, this feature is not on by default. You don’t have to worry about any security implemented implications of it, unless you explicitly turn this feature on.
What kind of security implications are we really talking about here? How concerned should you be by turning this feature on if you are an Appium administrator? Personally, I don’t think you should be that concerned because we take a lot of care in really delineating what you can and can’t do with the code snippets you send in.
First of all, all the code is not actually executed in the Appium context. It’s executed in a completely separate node.js process, so it doesn’t have access to any of the objects in Appium’s memory. It can’t snoop on other sessions that are happening. It actually has no access to any of the node.js API itself, so it can’t read anything from the file system or call any of the standard node.js libraries.
All it has access to is the driver object from WebDriverIO, which is pre-connected to your session, not anyone else’s session. There’s a console object, so you can write logs to the console. There’s a promise object in case you want to insert some sleeps or something into your script. So this is a pretty minimal set of things. You have access to the full JavaScript language and syntax, so you can write loops and if statements and things like that. Otherwise, it’s not like you have a lot of tools at your disposal to try and do anything nasty.
I should also say that with this API you can write logs which get returns to you as part of the API response, and you can also return any kind of object that you want. As long as it’s JSON serializable, you’ll get that object back in your client script. Also, if you return an element from this script, like you wanted to find an element and return it as the last step in your driver script, that will be turned into a web element that you can use as a native web element in your test script too. So it’s a pretty intuitive and pretty useful feature.
So, let’s talk about what this looks like in practice in terms of solving the latency problem. Because remember the whole idea behind this is that if you can combine a bunch of commands into a batch and have them executed locally to the Appium server, then you save the time lost due to latency for the request and response for each of those commands. So we should expect that if we use executeDriverScript and put our commands in this batch mode (instead of running them one at a time) that the latency problem will basically go away. That could have a large speed up or time savings within our test steps, if we’re executing our test on servers that are not very close to our client’s script.

So this is indeed what we find. Here is a little chart of some test that I ran in this series of tests. I basically compared time loss due to latency across local execution on devices that are not close to me but not too far away in California and then devices which are quite a bit further away in Tokyo, Japan. So what we can see is if we just look at the average test time for the scenarios where we’re not using execute driver, that the farther the server gets away from the client, the higher the average test time and this is solely due to latency. This isn’t due to the Appium server device taking longer in those places. We’re actually just adding all of these seconds due to latency.
So, you know between running locally and running in Tokyo, we’ve got about 2x different. So it takes twice as long for a test to run in Tokyo as it does locally, just because Tokyo’s farther away. So when we look at the situations where we are using execute driver what we see is a pretty significant speed up. We don’t see the speed up locally. We see a 0.8% speed up. That’s because we save almost no time by batching commands. I’m surprised we see anything at all. This 0.8% should probably be regarded as nill, because time loss due to latency on the local network is basically nill.
When I’m running tests on devices in California from my office in Vancouver, I see about a 40% speed up if I put my commands within the executeDriverScript batch. Against Tokyo devices, I see an even bigger speed up. So just in case you’re wondering what are the details of the test that I ran.

These are on real Android devices in these different places around the world. Each test condition: so combination of server location and choice of executeDriverScript or not contain 15 separate tests. Each test contained five loops of a login/logout flow, the same steps that I showed you earlier. In other words: each of these 15 tests contain 90 commands for a total of 1,350 commands for condition. So we were able to get a pretty significant number of commands, so I think that our results here are pretty solid.
It’s also we’re saying that the speed-up percentages you see are speed-up of test time, not total session time, so this doesn’t include session start up. Session startup can be a big factor in overall test time, but test time is highly dependent and variable based on the number of test steps you have, whereas startup time is not. So, I didn’t factor that into the speed-up, so that we are really comparing apples to apples here.
So to summarize this section on executeDriverScript, latency can be a huge cause of slowness and unreliability. We can work around this using executeDriverScript by batching whatever commands we want into a single HTTP call. ExecuteDriverScript uses the Webdriver IO API. You basically write WebdriverIO code as a string and then send that to the Appium server (which then unwraps that and executes it).
Because of potential security concerns, you do need to start Appium with a special flag to make sure that you’re not unknowingly opening yourself up to the security implications. That being said, there are very few really bad things that I think are possible within this model, but I should disclaim that I’m not a security expert. There are hackers out there that are probably a lot smarter than me who might be able to take advantage of this. So, talk to your security people. Figure it out. Beware.
I should also say that while this is I think a really interesting feature, you shouldn’t use it just because you want to speed things up. If you don’t have a real problem with latency, there are lots of problems with it. For example, stack traces no longer will be shown to you at a certain line in your client script. You’ll have to dig through the Appium logs to figure out what exactly failed and where. So there’s a few different reasons that it’s probably not a good idea to use this unless you really need the performance benefits that it can provide. That being said, I think it’s a pretty interesting new feature.
Direct Connect
So, let’s move on and talk about another strategy for reducing the amount of time lost to latency – this time specifically when running tests on cloud services that themselves have devices scattered around the world. So, another way of putting this is that execute driver script helps latency lost or time loss due to latency between your client script and the endpoint where your client is speaking to at the cloud service.
But what about latency that exists within a cloud service itself? This can be an issue because many Appium clouds use load balancers to make life easier for the users of that service. In other words, what we can find is an architecture like this, where you’re the user of this cloud service writing a test and you’re using an Appium client, which is local to you. Then as the location of the Appium server that you encode in your scripts, you’re given some kind of cloud service entry point. This is often a load balancer. So no matter which devices or locations or platforms you’re automating, there’s often a single Appium endpoint that’s kind of an entry point into the whole cloud service.
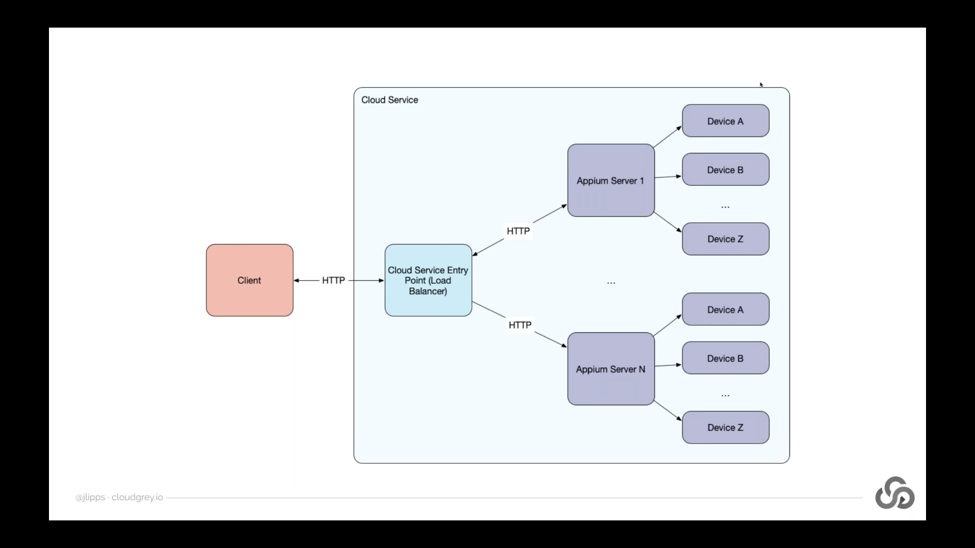
That load balancer is responsible for sending your Appium requests to other Appium servers, potentially hundreds or thousands of other Appium servers, which are themselves connected to devices or emulators or simulators. The load balancer is responsible for keeping track of session IDs and making sure that create session requests are getting sent to the right place and that subsequent commands are getting sent to the right place. So this is a very common architecture that we find.
Notice that within this architecture, we don’t just have an HTTP request between the client and the cloud service entry point. We also have HTTP request between the entry point, the load balancer, and the kind of most remote Appium servers or the utmost Appium servers that are actually connected to devices and actually running the Appium software. So what kind of network connection lies between the load balancer and these Appium servers? Well as a user of the cloud service, you don’t necessarily know. It could be local, it could be within a single data center, but it could also be across the world. You might have a load balancer in California and an Appium server in Tokyo, and that’s quite a bit of a way apart.
So if you’re running a test from Tokyo, now your requests are going to California and then back to Tokyo, when theoretically that’s a bit unnecessary. So there is time loss due to latency within cloud environments as well. Unfortunately, you have no real control over that. It all depends on how the cloud service has architected system. So if before we have this formula where total latency or time lost is the number of commands plus 2, times the latency doubled, now we actually have something a little bit more complex where we have both the outside latency and the inside or internal latency. You actually have to add those together when you’re dealing with a load balancer and then multiply the result by 2.
So here’s an example. This is what I actually ran in my experiments with this. We’ve got commands going from Vancouver to a load balancer in California and then over to Japan (where this is not completely out of the way, but there is a more optimal path for my request take, which would be if I went directly from Vancouver to Japan). Depending on the way that internet traffic routing works, this might be actually a lot faster, because they’re obviously physical constraints due to the speed of light. Things like that. But there are also other practical constraints, like which paths packets have to take. It might be even less efficient going through California than this simple picture shows.
So, the good news is that because of some work that we’ve done in the Appium client libraries, cloud providers can now have their load balancers (their entry points) directly connect clients your test scripts to more remote Appium servers (the ones that are directly connected to the Appium devices). So that turns the previous architectural diagram into something that looks a lot more like this: where after the initial request to the load balancer, any subsequent requests from the client to the Appium server no longer goes through the load balancer as an intermediary. Instead, it goes directly to the Appium server. So, it essentially cuts out the middleman, saving any time loss due to latency that you get from making these multiple hops.
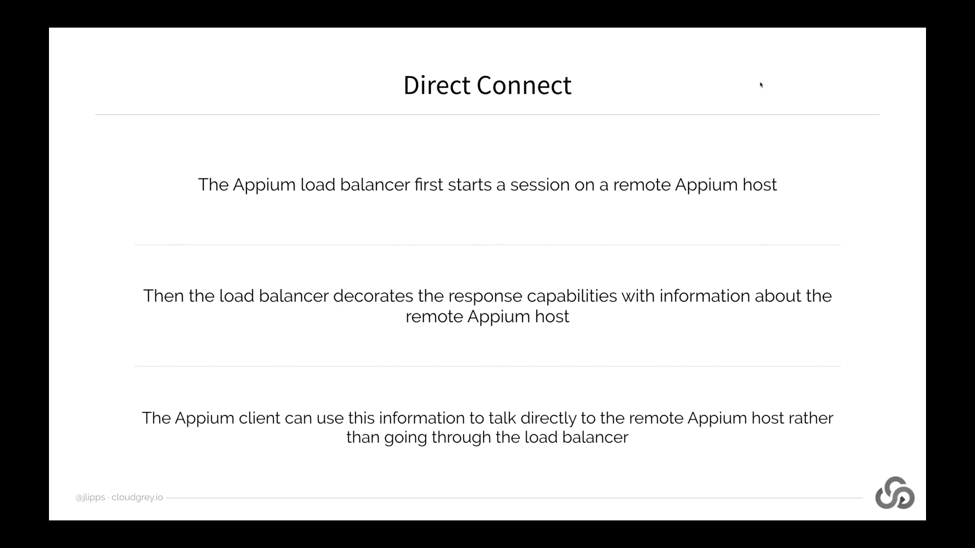
We call this Direct Connect. Basically the way it works is that your client first speaks to the load balancer, which starts a session on a more remote Appium host somewhere within the cloud service. Then the load balancer, when it responds with the new session result to your client, it decorates that response with information about these specific remote Appium host (which is going to be servicing your session).
Now the Appium client can use that information to talk directly to that host, rather than going through the load balancer if it wants. So, the way that the load balancer decorates the response is by adding specifically these keys to the response object. They all start with Direct Connect. Obviously, we have to specify these four pieces of information: the protocol that should be used, the host, the port, and the path that should be prefixed to any of the API calls.
So, HeadSpin was able to implement this for me so I was able to again gather some data on the actual consequences of using this feature in terms of time loss due to latency. So again, let’s run some numbers. The way that this test worked was very similar to the way that the executeDriverScript worked. I basically had all the tests clients located in my office in Vancouver, and I ran tests on devices located in California and Tokyo, Japan – sometimes using Direct Connect and sometimes not using Direct Connect.
Sometimes when I wasn’t using Direct Connect, my requests were going to California and then on to the devices. Sometimes they were using Direct Connect and going directly to the most remote Appium server. So interestingly, and I think this is a good illustration here, what we see when using Direct Connect with sessions pointed at the California devices, is basically no speed – a very very small speed up of 1.2% (which you might consider real or might just be an artifact of the tests that I ran). That’s because the load balancer is in California and the devices are as well.
Whether or not I’m using Direct Connect, basically the commands are following the same route. There might be a little bit of an extra bit of time loss due to latency between the load balancer in California and the devices in California, but they’re so close to each other it basically doesn’t make any difference.
We can see a huge difference, however, when I ran tests on devices in Tokyo. Because when using Direct Connect, my test commands were able to go directly to Tokyo and back rather than going first to California and then onto Tokyo. We saw that just by cutting out this hop to California, we were able to get a speed-up of about 30%. The details of the test that I ran are basically the same as before – about 1,350 commands per condition. These results are pretty solid in my opinion.
FAQs
1. What is WebDriver?
Ans: WebDriver is a remote control interface that provides introspection and control of user agents. It offers a platform- and language-neutral wire protocol for out-of-process programs to remotely instruct the behavior of web browsers.
2. What is the difference between Appium driver and Android driver?
Ans: Appium driver is an abstract class derived from the selenium java client. This class is inherited by the Android driver and iOS driver class to provide implementation and additional functions used in a mobile automation test on Android devices/iOS devices.
3. Is it possible for testers to run tests in a multithreaded environment by using Appium?
Ans: Testers can run the tests in a multithreaded environment using Appium. However, testers must ensure that no more than one test runs simultaneously against the same Appium server.
4. Which languages does Appium support?
Ans: Appium supports all languages that support HTTP requests, like Java, JavaScript with Node.js, Python, Ruby, PHP, and Perl.


-1280X720-Final-2.jpg)


