AI-Powered Key Takeaways
Introduction
I am often asked how to integrate HeadSpin with Jenkins. In this blog, we'll explore how Jenkins testing can be effectively utilized with the HeadSpin platform. Jenkins, being one of the most popular CI/CD tools in the market, provides a number of ways to construct your job, be it FreeStyle, Pipeline, MultiBranch, etc. Since it would be impossible to cover each possibility, I will just talk about how to use a Freestyle project.
What is Jenkins?
Jenkins enables developers worldwide to build, test, and deploy their software reliably. It facilitates continuous integration (CI) and continuous delivery (CD) by automating various stages of the development lifecycle, including builds, tests, and deployment. Jenkins supports many plugins, allowing it to integrate with virtually any CI/CD toolkit tool.
Why Use Jenkins for Test Automation?
Using Jenkins for test automation is highly beneficial due to its flexibility. Jenkins automates the execution of test suites, providing immediate feedback on the impact of recent code changes. This ensures that any introduction of errors or bugs is immediately caught and can be addressed, enhancing the quality of the software. By integrating Jenkins with test automation frameworks, teams can trigger tests automatically upon code commits, ensuring that new code is rigorously tested before merging or deploying. By leveraging Jenkins testing, teams can automate their test execution, significantly enhancing efficiency and accuracy.
Benefits of Jenkins
One of the key benefits of Jenkins is its ability to streamline the testing process, making Jenkins testing a critical component of software development.
- Automation: Automates the software development process, from code building to testing and deployment, reducing the need for manual intervention.
- Flexibility: Supports various languages and platforms and integrates with numerous tools through plugins, making it highly adaptable to different environments.
- Continuous Integration and Delivery: Facilitates CI/CD practices, enabling teams to detect issues early, deliver updates faster, and improve software quality.
- Scalability: Can handle projects and be scaled up to work with large distributed systems.
- Community Support: Has a large and active community, providing a wealth of plugins and resources for users.
Limitations of Jenkins
- Complexity: It can be complex to set up and configure, especially for beginners or those working on complex projects.
- Maintenance: Requires regular maintenance and updates, especially when using numerous plugins, which can sometimes cause compatibility issues.
- Resource Intensive: This can be resource-intensive, especially when handling large projects or multiple builds simultaneously.
- User Interface: The interface is not as modern or intuitive as some of the newer CI/CD tools.
What is the biggest CI/CD Challenge for Mobile Applications?
When employing a Jenkins CI/CD process within your organization, the advent of virtual machines made it extremely easy to spin up virtual environments for your traditional web applications. However, when using CI/CD for mobile applications, there is a big hurdle to overcome: how do you deploy your applications on real devices and test them? Obviously, you can test on simulators and emulators, but they don’t give you the complete picture of how your application works. Not only that, your customers are NOT using your application on a simulator or emulator, so why test on something that they are not using? The only way to get real-world, accurate feedback is to test on real devices. But how do you get access to real devices for your Jenkins CI/CD process? Use the HeadSpin Platform! HeadSpin provides access to a plethora of devices deployed in multiple locations around the world. Leverage these devices in your Jenkins CI/CD process and get real feedback from real devices.
How Do I Get Started with Jenkins?
It’s easy to get started with Jenkins. Simply visit their website page for a Free Download here and download the appropriate package. The important thing to remember about Jenkins is that it is comprised of multiple parts: the Controller machine and the Agent machine(s). Agents actually do the work that is built into the job. The Controller and Agent can reside on the same machine, but in a production environment, you will most likely have multiple agent machines.
Question: Do I need to install anything specific/special for HeadSpin?
Answer: On your Agent machines, you will be executing REST API requests, so you will need to install whatever mechanism you want to use for that, something like curl or similar, to execute these commands.
Decide On Your Process Flow
One of the powerful features of Jenkins is the ability to build your entire process the way that you want to. Jenkins is flexible enough to handle any process flow that you want to create. It is critical that you decide what your process flow is so that you can build your job to follow it.
For the basis of this blog, my assumption is that you have already built the Android .apk and the iOS .ipa files. I will not cover how to build these applications with Jenkins because there are other resources available to instruct you on how to build these applications.
Create Your Automated Tests
This is the most critical aspect of your CI/CD process. You must be able to test the new version of your application before you release it to production. The only way to efficiently do that is with automated testing. Again, this blog will not cover the plethora of automated testing tools available in the marketplace nor how to write effective tests. There are other resources to cover those topics. However, as it relates to Jenkins, these automated tests need to be executable from a command line.
Let’s get started.
Create Your Job in Jenkins
Jenkins supports a number of different jobs, so for simplicity’s sake, my example in this blog will be using a Freestyle project. But the same process would apply no matter which type of job you want to create.
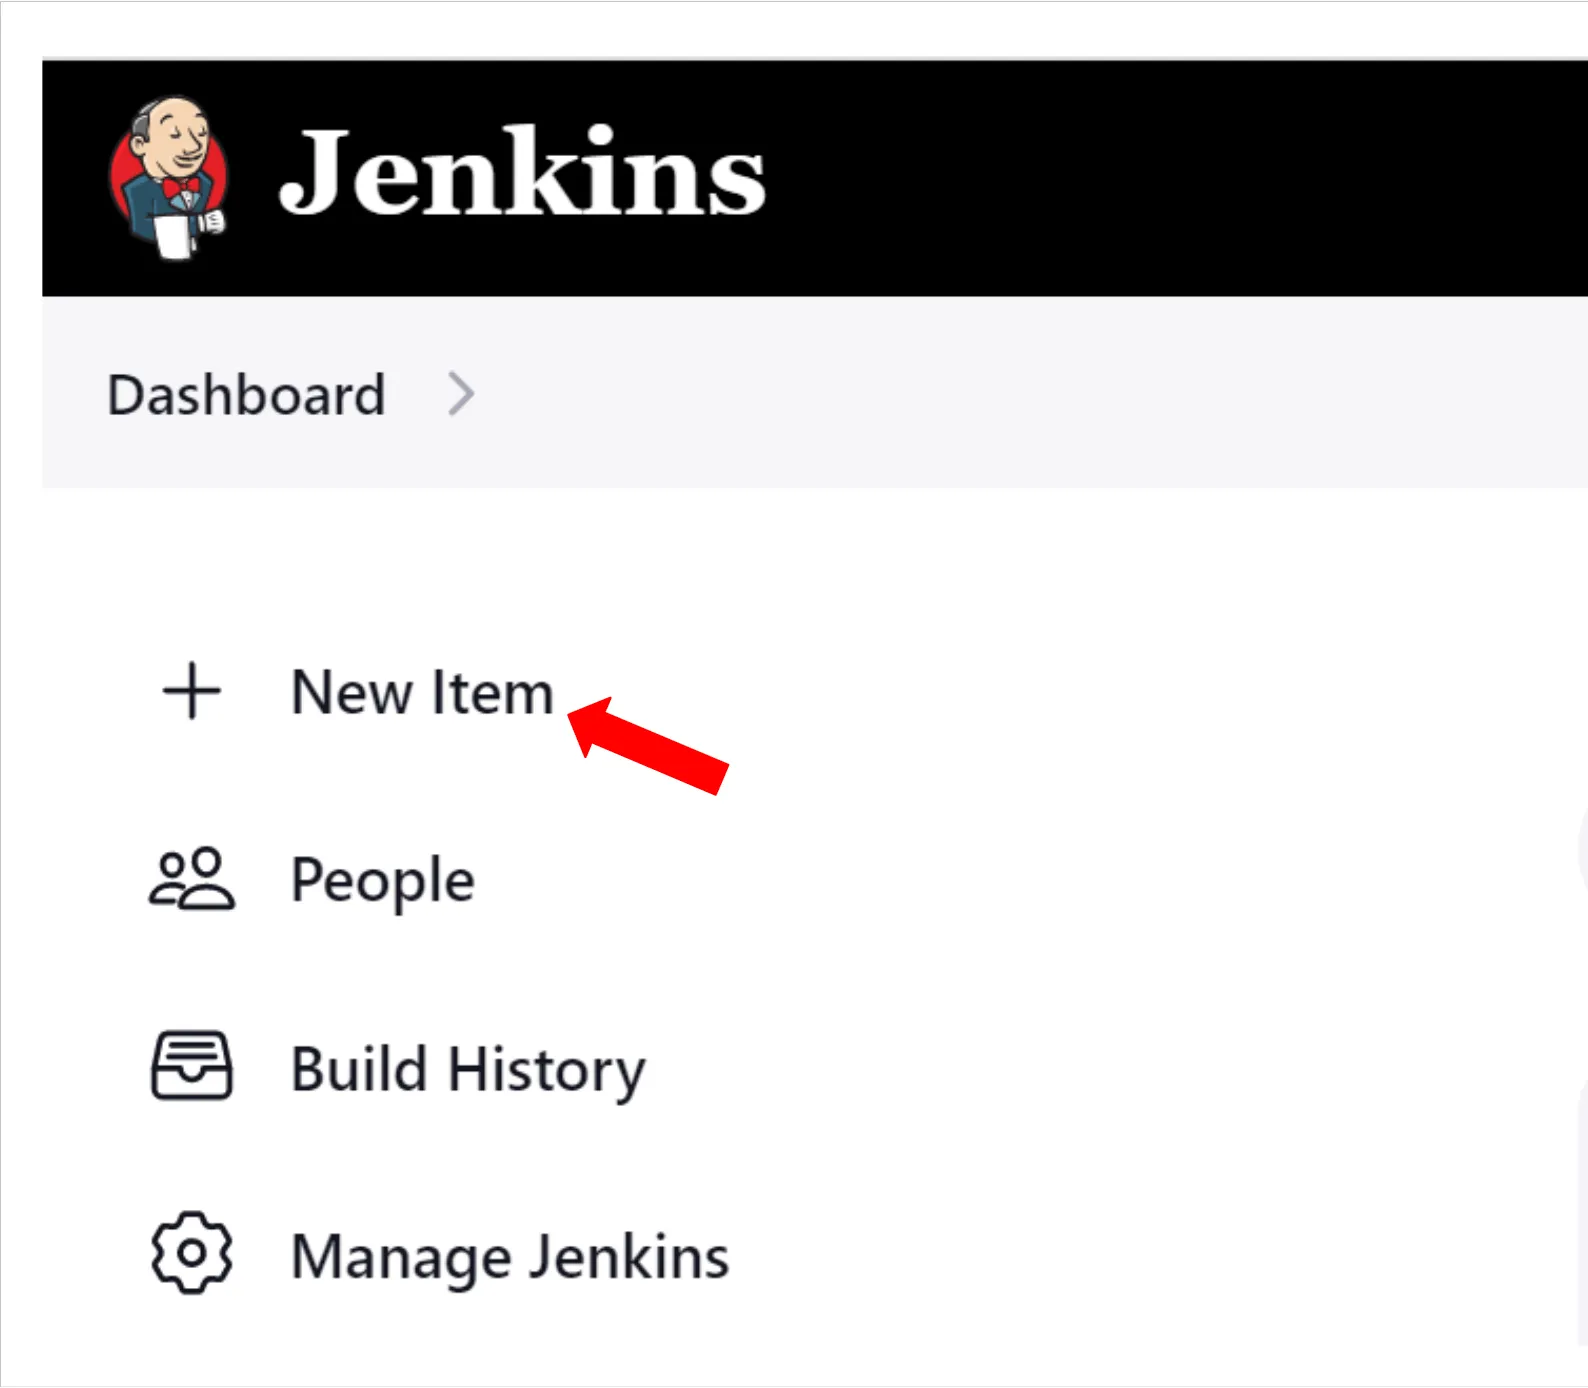
On the Jenkins Dashboard page, click on + New Item:
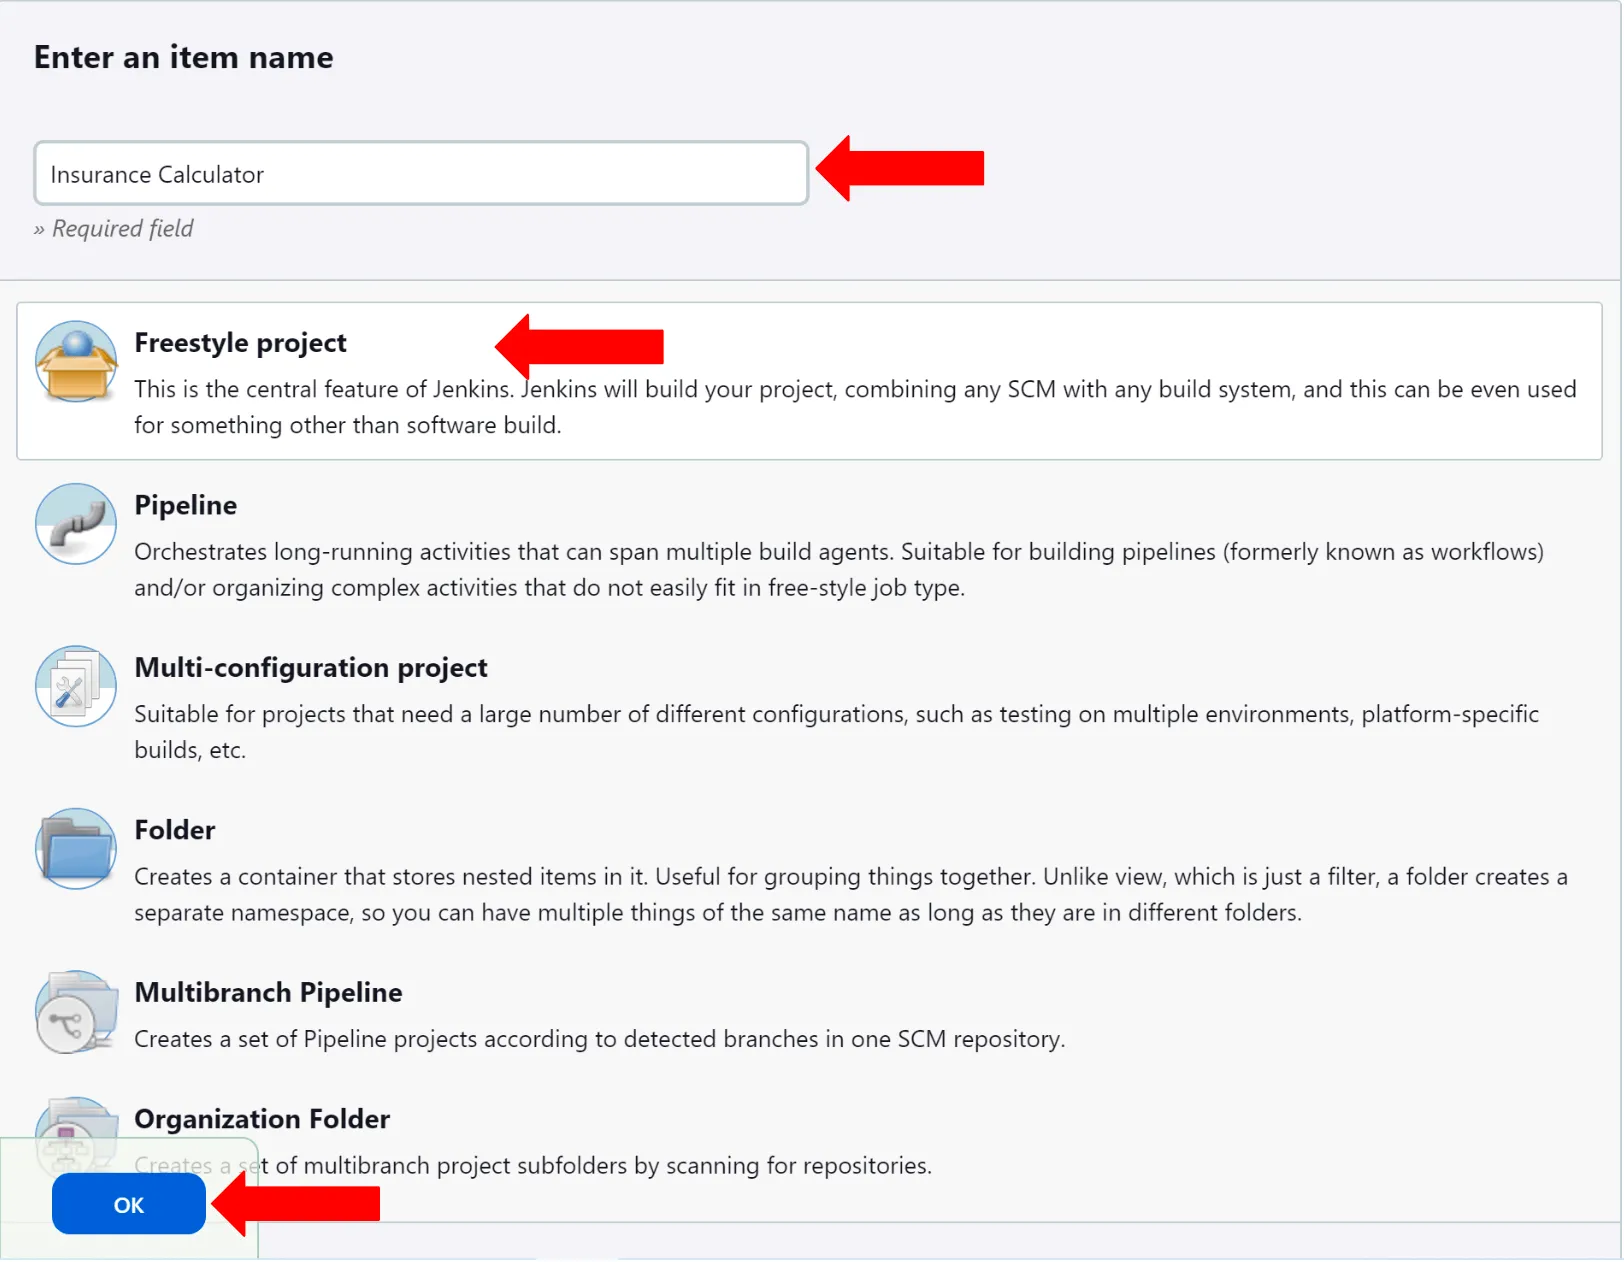
Then enter a name for the project, select the type of project (I am using Freestyle), and then click on OK to save the project.
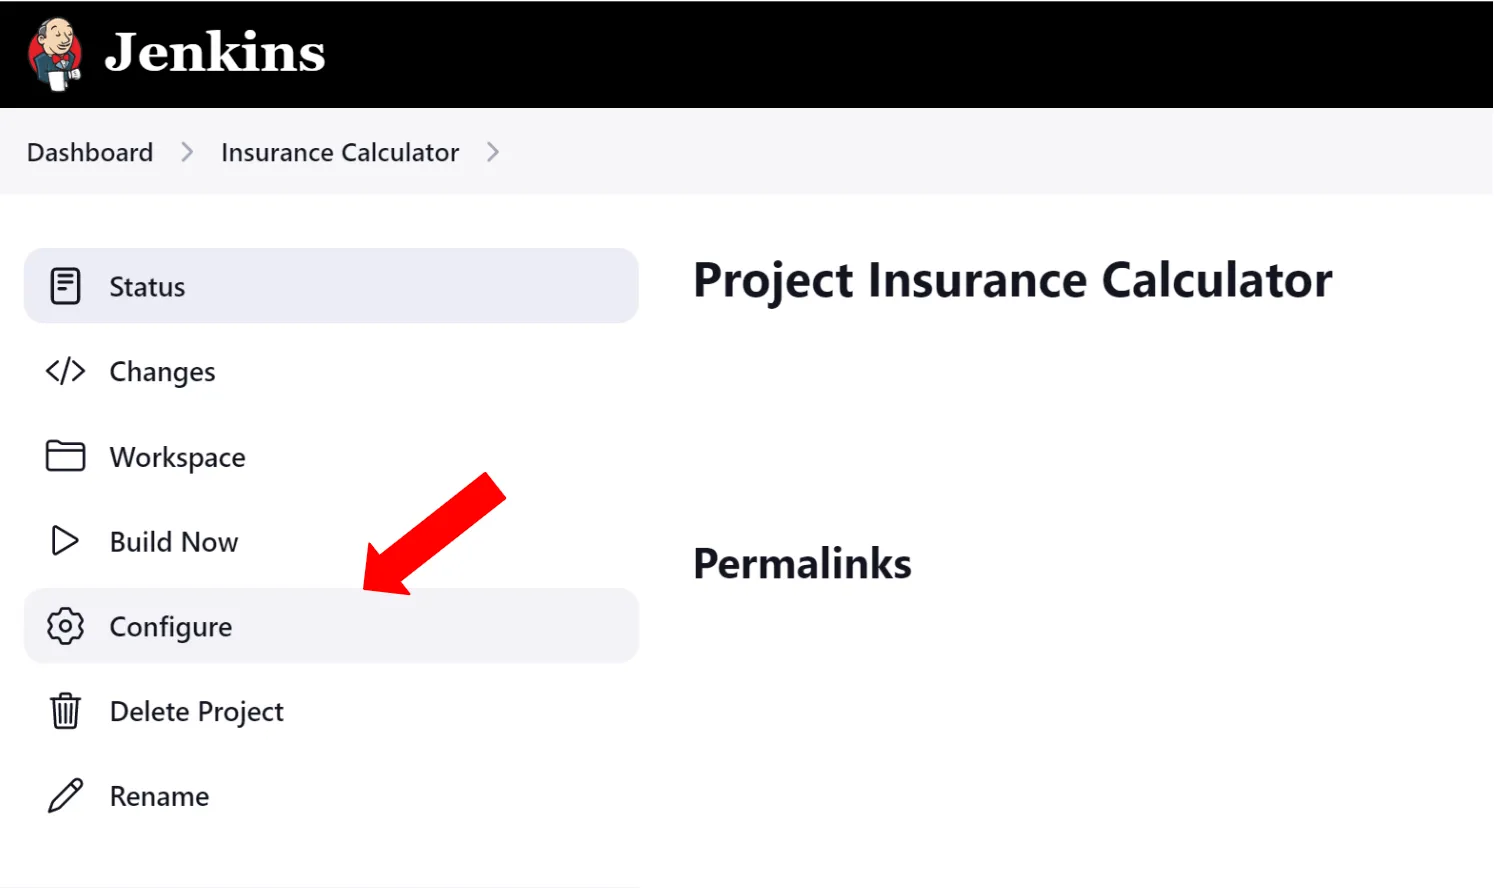
To add your build steps to your project, click on Configure. This will allow you to create build steps and any other tasks that you want to do as a part of your process.
Now we can create the build steps.
This is where you need to make a decision on your process flow. For mobile testing, you need to install the application directly on a real device. Should you take the time to upload and install it on each and every device that you want to use with your job? That could be time-consuming. I recommend that you leverage HeadSpin’s capability to upload the application to the HeadSpin Platform once and then install the application from there onto the devices for your test.
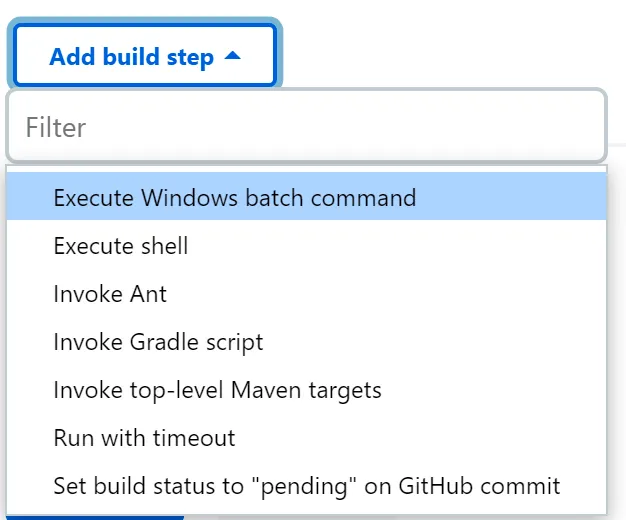
To create a Build Step, simply click on Add Build Step and select the appropriate type of step: Windows Batch Command or Shell Command:
In this first build step (again, the assumption is that you have access to the .apk or .ipa file that has already been created), I will leverage the HeadSpin REST API call to upload the application to the HeadSpin Platform. Here’s the advantage of using HeadSpin’s REST API: there are no username/password requirements. The API calls include an API Token as your unique identifier, so there’s no need to worry about setting a username and password. Let’s talk about how to use the HeadSpin API.
HeadSpin API
How do you get started? First, you need to make sure you have your API Token generated. To generate your API Token, login to your HeadSpin account and click on your name in the top right corner of the screen:

Then click on Settings:

Then, if there is no API Token already generated, you can click on + New Token to generate a new one:

But what is even better, HeadSpin assists you with your API calls by already including your API Token in the API examples in the documentation. If you go to the Application Management documentation here without logging in first, you will see the example for uploading an application with a variable for the API Token called <your_api_token>:

However, if you are logged into your HeadSpin account, the API Token value is automatically filled in:

This makes it extremely easy to copy and paste these commands for your API calls.
Ok, back to our Jenkins project. Let’s talk about uploading our application.
HeadSpin uses metadata selectors when uploading applications, in fact there are 17 metadata selectors to uniquely identify the uploaded application. You can view those selectors on the Application Management documentation page here. Some selectors are automatically derived from the application itself, like the app identifier, while others are user provided, like build_type or version_tag.
In the example below, I am uploading my apk file and assigning a value to the application version_tag metadata selector:

Once the application is uploaded, now you can quickly and easily install it on the devices that you want to use for your test. In this example, I am using the version_tag value to install the correct version of the application for this test:

Now that the application is installed on the target device, it is time to execute the test automation script. Again, this is the most critical part of the CI/CD process. Without effective test automation scripts, you can’t be sure your application is working as expected.
In my example, I am using an Appium script written in Python. HeadSpin supports a wide range of test automation tools. The key aspect here, for Jenkins, is that you need to be able to execute the script from the command line. I use Python to start the script:

One of the most prevalent test automation tools for mobile devices is Appium. When using Appium with HeadSpin devices, you can leverage the unique features that HeadSpin provides. For example, there are a number of HeadSpin specific Appium Desired Capabilities that you can use with your test. The entire list can be found here. One of the most important ones is the “headspin:capture” capability. When this Desired Capability is set to true, then the entire test session will be recorded, including all of the network traffic transmitted during the test. It is stored as a HeadSpin Performance Session that can then be analyzed and compared to other Performance Session runs, and the data can be reviewed in the HeadSpin dashboard.
You can also assign this Performance Session to a User Flow, another important construct in the HeadSpin Platform, by setting the “headspin:testName” Desired Capability with the User Flow name. Such as:
'headspin:testName': 'Demo_Insurance_App'
With this Desired Capability set, every time you execute the test, the resulting Performance Session will be assigned to the Demo_Insurance_App User Flow. Then you can leverage HeadSpin Regression Analysis capabilities to monitor any difference between the test runs.
In Jenkins, when you execute a build step, any output to the command line will also show up in the Jenkins Console Output to view and track each build run. So, any commands that you have in your script to print to the command line will also show up in the Jenkins Console Output for that build run. This is a good way to track and document the progress of your test execution. When we review the Console Output, you will see an example of this output.
The last two steps of my Jenkins project are my clean-up steps. Again, your post-test activities can be whatever suits your own process. For me, I am deleting the application of the device and deleting the application from the HeadSpin platform.


Build Your Jenkins Project
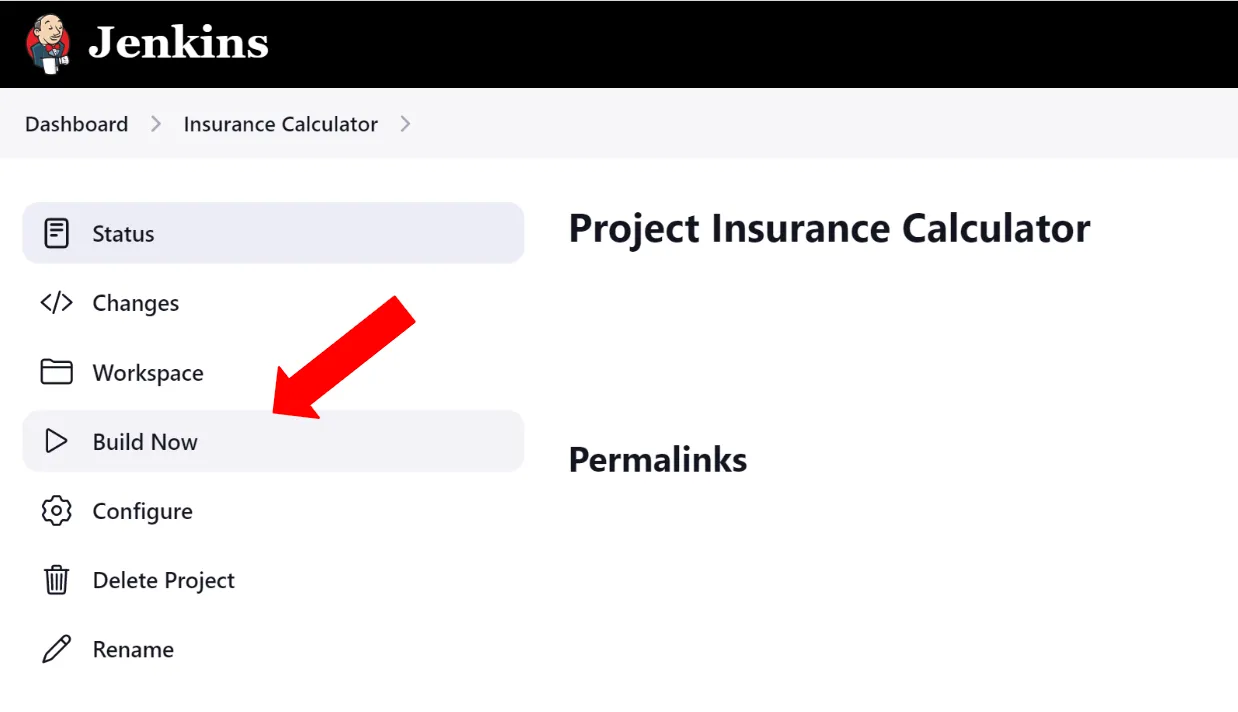
Now that you have finished building your project, it is time to execute it. You can click on Build Now:
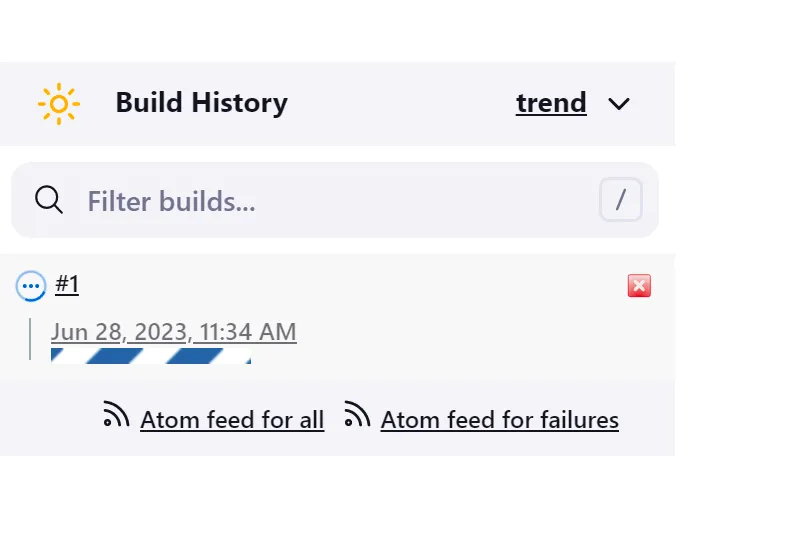
View the Console Output
When the project has completed its execution, you can see the results in the Console Output. Click on the Build Timestamp arrow, and then select Console Output:
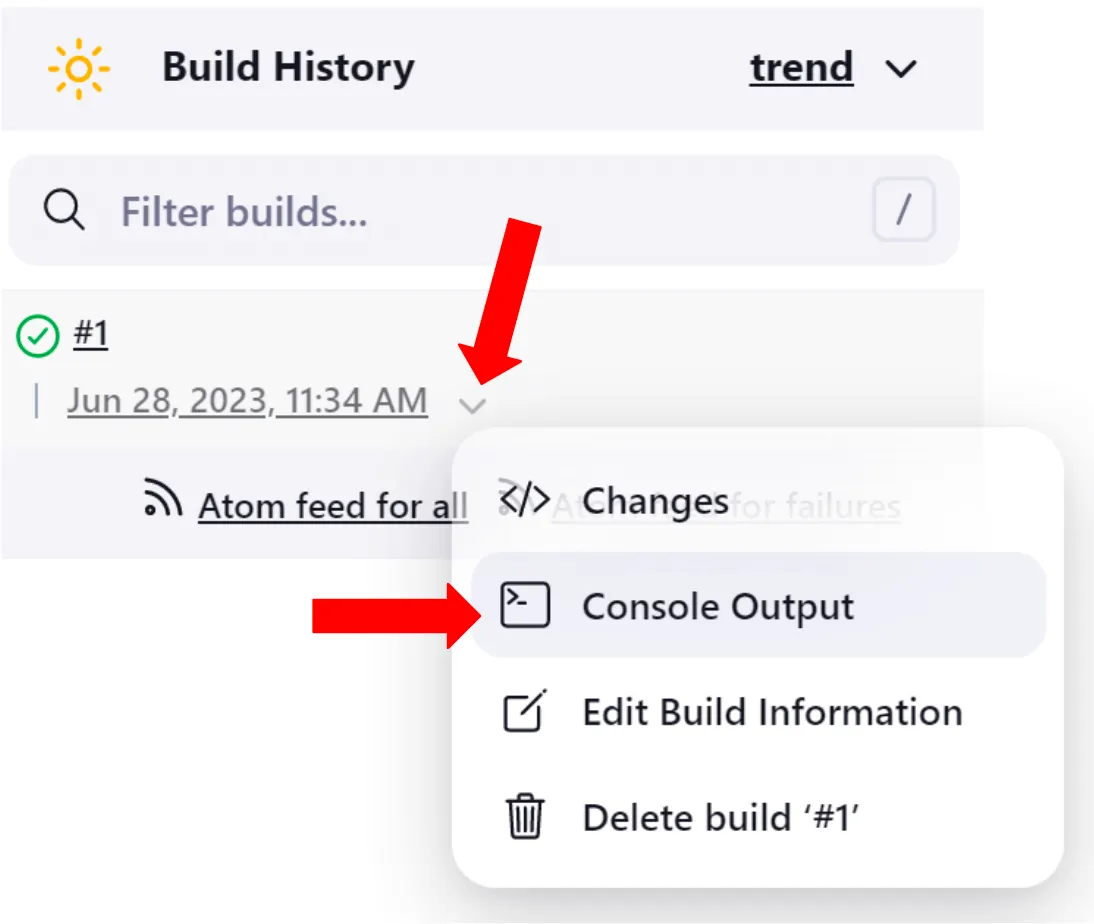
You can view the progress of your Jenkins job in the Console Output. As mentioned earlier, I included print(‘ ‘) commands in my script to document the test progress. You can see these commands in the screenshot below:
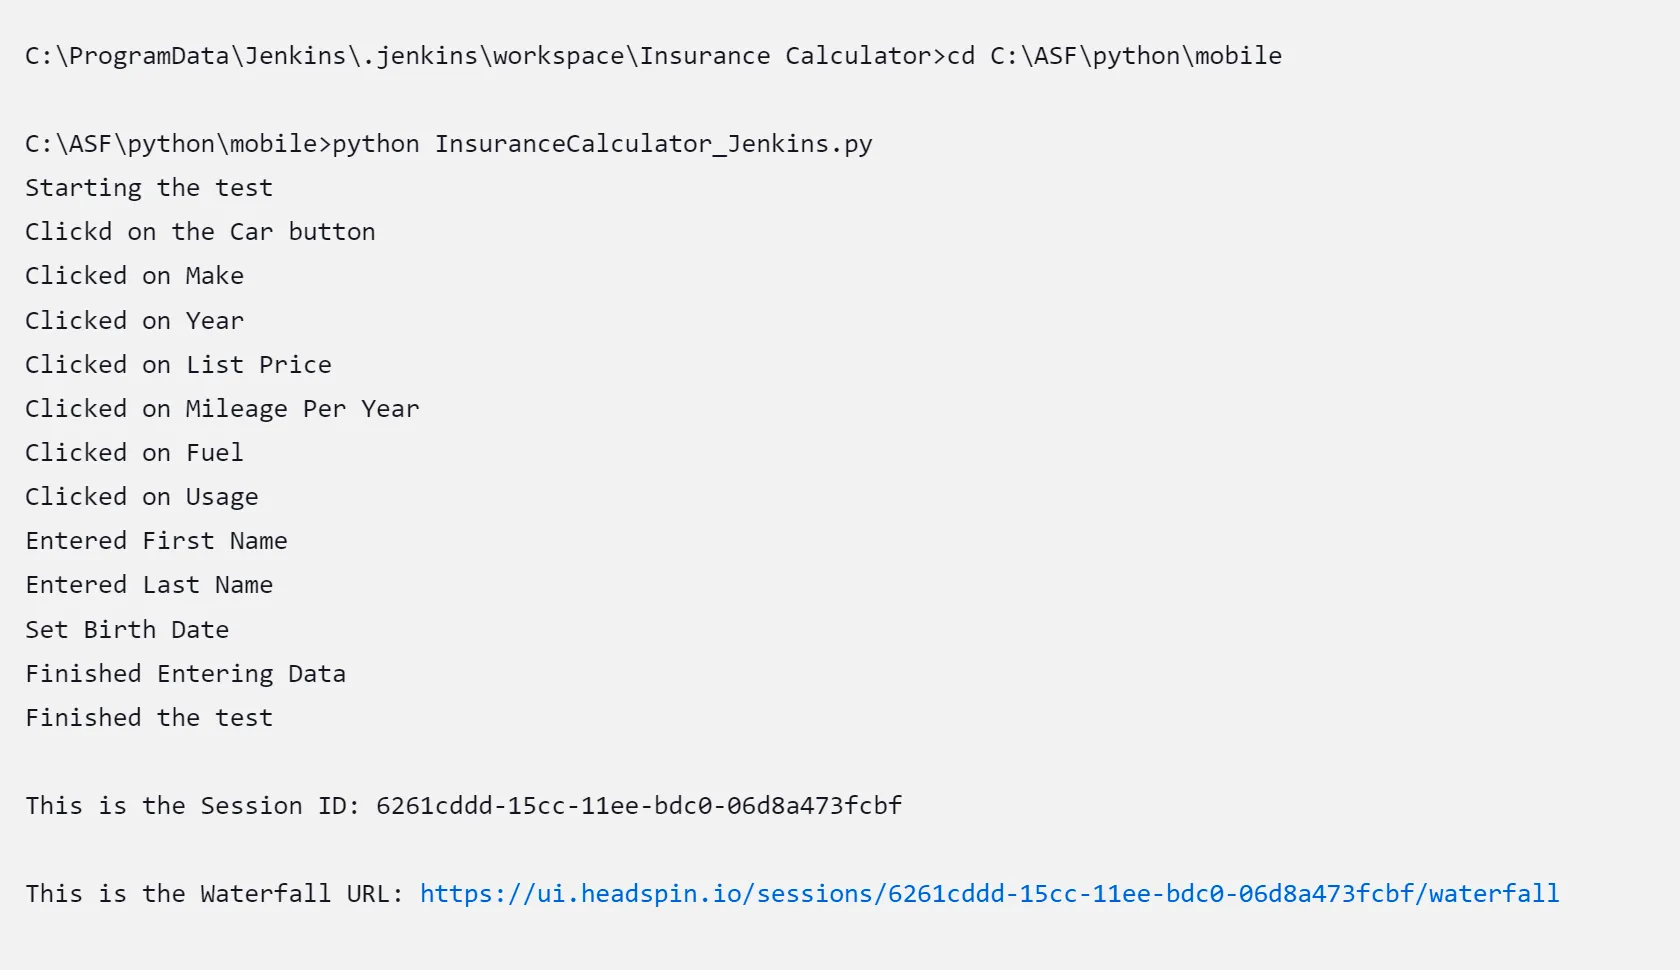
You can see the step-by-step progress of the test as it executes its actions.
You’ll notice the last two lines of the output are the Session ID and the URL link to the recorded Performance Session. I captured these values during my test and sent them to the Console.
The reason for doing so is because once you have the Session ID, you can leverage the extensive Session Analysis capabilities that are listed here. There are too many options to be covered in this blog, but you can use these APIs to examine the session and highlight any specific area of interest to you.
View the HeadSpin Performance Session
Because I enabled the headspin:capture Desired Capability, you can also view the Performance Session to view the results captured by HeadSpin by clicking on the Waterfall URL in the output:
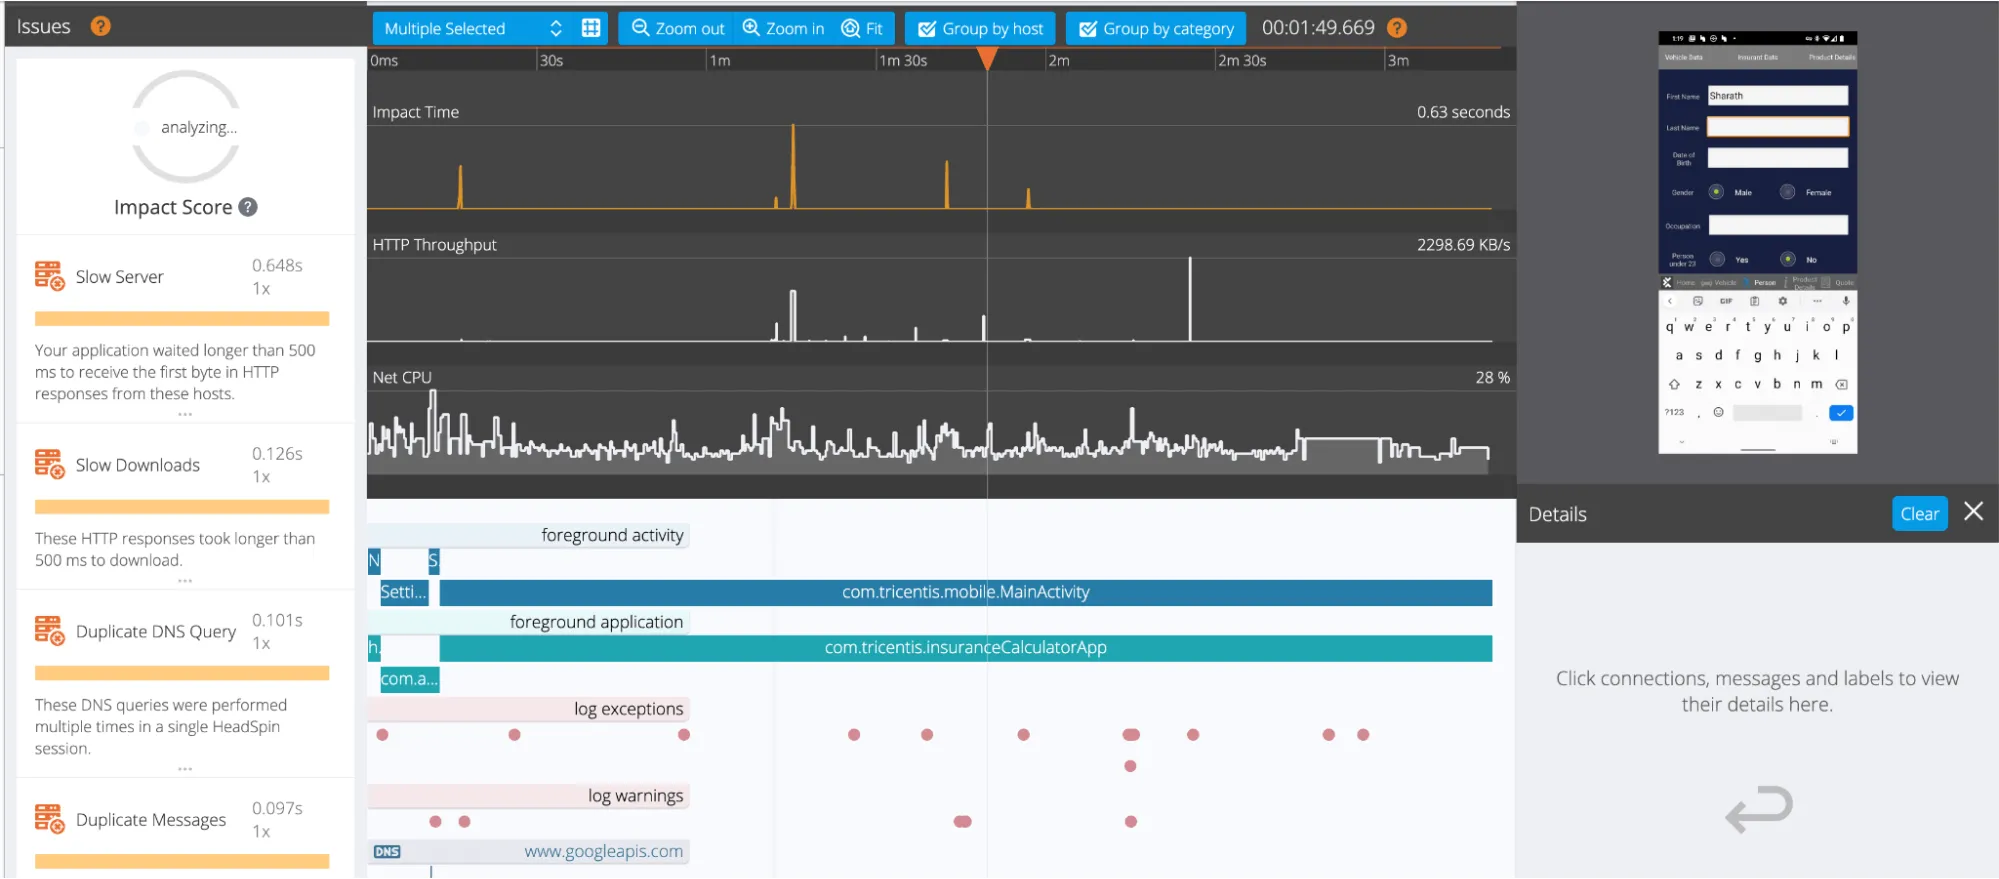
This will allow you to view, examine and analyze the session recording and all of the captured KPIs, the Issues detected by our AI Engine, and access to the session artifacts for download, such as the device log and the network files (.har & .pcap). You can view information about the Waterfall UI here.
Now you should be able to utilize Jenkins and HeadSpin together in your CI/CD process. But what about parallel testing? This next section covers that topic.
Test Execution on Multiple Devices
One of the advantages of using Jenkins and HeadSpin together is the ability to run tests across many devices. There are various ways to accomplish this, and since HeadSpin doesn’t limit how many tests can be run concurrently, you have the flexibility to orchestrate this within Jenkins however you desire. One method might be to replicate the two steps of installing the application and starting the automated test for each device that you want to execute your test on. Or, if you are using TestNG as your test automation framework(or another framework that can start multiple threads), you can start multiple test threads on different devices. It all depends upon your test framework on how it supports executing tests on multiple devices. Some frameworks can only execute on one device at a time. In this case, you could set up multiple Jenkins Agent machines, each executing the test on a device.
Why Would I Want to Use the HeadSpin Platform in my CI/CD Process with Jenkins?
There are several reasons why you would want to leverage the HeadSpin Platform for your Jenkins automation tests:
- Access to a vast range of devices and browsers located around the world
- Leverage HeadSpin’s broad and extensive REST API capabilities
- No limit on how many tests can be run parallelly
- Leverage the comprehensive KPI data capture, including all network traffic to the device
- Utilize the Regression Analysis feature of HeadSpin to conduct in-depth session analysis and comparison
- Ease of reporting with HeadSpin’s Dashboard capabilities
- Support for virtually every test tool in the market, offering you the freedom to choose the one that best fits your environment.
Conclusion
Jenkins is one of the most powerful CI/CD tools available in the market today. Incorporating Jenkins testing into your development pipeline can significantly improve your software's quality and reliability, but in order to sufficiently test your mobile applications, you need to combine that power with the capabilities that the HeadSpin Platform offers. It’s easy to integrate these two world-class products together to take your CI/CD process for mobile to the next level. In addition to testing on a multitude of real devices deployed around the world, you can take advantage of HeadSpin’s comprehensive data capture, regression analysis, and dashboard reporting capabilities.


.png)




-1280X720-Final-2.jpg)


