


.png)


.png)


AI-Powered Key Takeaways


This post is the first in a 3-part series on visual testing with Appium. Visual testing is an important category of testing and can catch visual regressions as well as functional bugs. The inspiration for this series comes from a free online video course on mobile visual testing I produced for Test Automation University. Check it out!
Why do we care about visual testing? Visual testing is a type of testing that overlaps with but is largely orthogonal to functional testing. Here's how I think about the differences:
- Functional testing ensures that there are no bugs in the relationship between the user inputs and the code outputs of your app.
- Visual testing ensures that there are no visual discrepancies between different test runs. Visual discrepancies could be a sign of a number of bugs, or a visual/aesthetic regression.
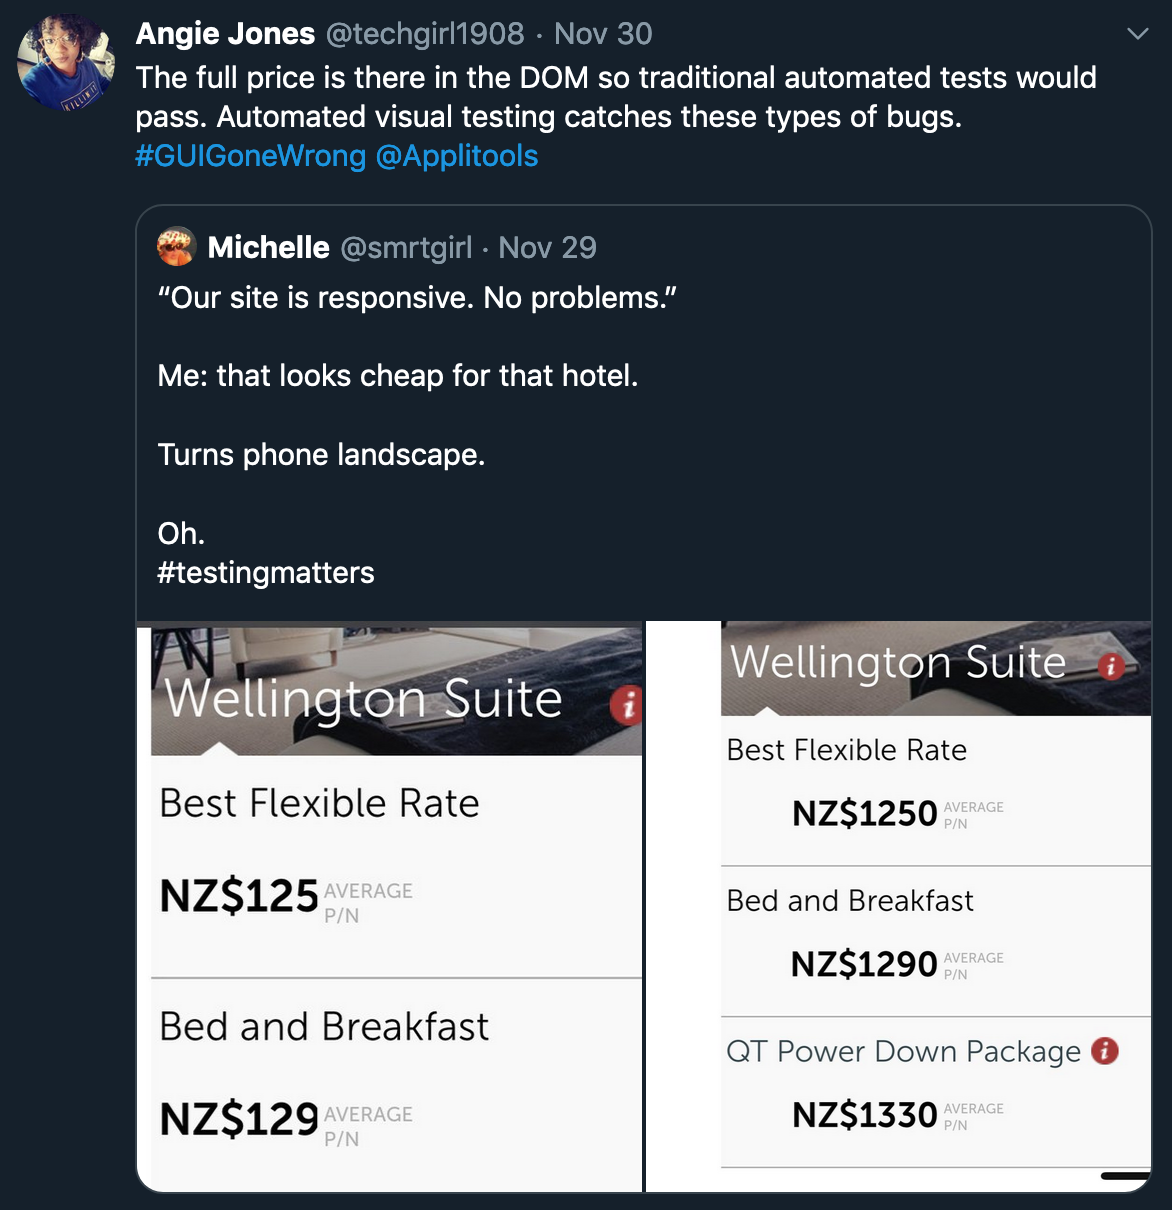
Visual regressions can be just as bad news as functional regressions, especially when they surface bugs that a functional testsuite wouldn't catch. Here's a great example found in @techgirl1908's Twitter feed:
Steps for visual validation
What do we need for visual validation? The basic principle is that, as we navigate through our app (in the course of a functional test, maybe), we take screenshots of each view we encounter. We then compare these screenshots with a previous screenshot of the same view, using some kind of image analysis software. If we encounter any notable differences, we may have found a visual regression, and at that point can either fail the test or simply flag the difference in some kind of database for a team to look at down the road.
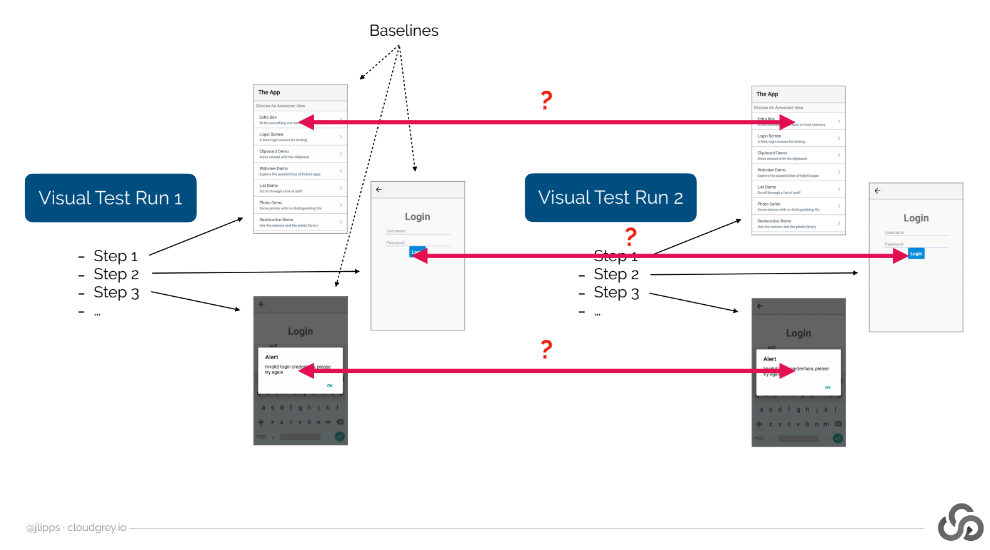
As pointed out in the diagram above, the images we use as a reference check are called "baselines." Typically we gather baselines on the first visual test run, and then compare against the baselines on subsequent runs.
Visual comparison with Appium
We already know how to get screenshots with Appium, so that part is taken care of. But how do we compare two screenshots to check for visual differences? As a human being, this is pretty easy (unless you're playing one of those difficult spot-the-difference games), but how on earth can we teach a computer to do this?
The short answer is that there are lots of smart people out there who have come up with clever algorithms for detecting visual differences. A naive approach to visual difference (checking identity of each pixel across the two images) would be way too brittle, since even compression algorithms might result in almost unnoticeable differences. But luckily for us in the open source world, we have something called OpenCV, which is a collection of image processing tools we can use without having to really understand in depth how they are implemented.
Additional system setup
Appium has integrated support for OpenCV, though it does not come turned on by default, since building OpenCV and its Node.js bindings takes a lot of time and must take place on individual platforms. The easiest way to get things set up for use with Appium is to simply run npm install -g opencv4nodejs. This will attempt to globally install the Node bindings, which will also take care of downloading and building OpenCV on your system. If that doesn't work, you can install OpenCV using Homebrew and then install the Node bindings with the OPENCV4NODEJS_DISABLE_AUTOBUILD=1 env flag in front, to tell it to use the system-installed binaries.
Once you've got the opencv4nodejs package installed, you also need to make sure it's accessible to Appium when it runs. One way of doing this is to run the npm install command without the -g flag, inside the Appium directory itself. Another solution is to ensure that your global node_modules folder is listed in an environment variable called NODE_PATH.
Image comparison commands
OK, we've got all this OpenCV business set up, so how do we actually use it from our Appium test code? With this handy command:
When you call this command with the appropriate image byte arrays (here, img1 would be our baseline, and img2 would be the screenshot we wish to validate), and with the appropriate options object (it needs to be an instance of SimilarityMatchingOptions), what you get back is a SimilarityMatchingResult object.
The all-important method on the result object is getScore, which will tell us how similar the two images we sent in were, in terms of a number between 0 and 1. To turn this into actual validation, we simply check whether the score is above a certain threshold (which should be experimentally chosen based on your app). If so, we consider there to be no significant differences. If not, we can either throw an exception to fail the test or flag the difference in some other way.
What's a good match threshold? I've been pretty successful with a value of 0.99, but your mileage may vary. Why do we need a value lower than 1.0? Because on any device screen there will be elements unrelated to the visual design of the app which are constantly changing--the time on the clock, if nothing else!
Visualizing the differences
Knowing that two images differ in some way is great, but that's not actionable information for a developer. What we want is the two images side-by-side, with any differences highlighted to make clear what the potential issues are. Thankfully we can direct the getImagesSimilarity command to give us one of these human-readable images by setting the option object appropriately:
If we've done this, then our result object will have another method on it:
This method allows us to save the visualized differences image into a File object.
Hacking together a visual validation framework
All of what we've seen so far is enough to check the similarity between screenshots, but this is not yet a visual validation system. For that, we need baseline screenshot management. The simplest way we can implement this is as follows:
- Specify a directory on the system to contain baseline images.
- Make sure that each visual check we do has a unique name, so multiple baselines can exist for different views.
- Whenever we trigger a visual check, first look to see whether a baseline exists. If it does not, then simply save the screenshot as the baseline. If it does, then compare the current screenshot with the baseline.
In code, we might construct a doVisualCheck method that implements this strategy (assuming all the static class variables have been set correctly):
Now, in our functional test cases, we can mix in visual checks however we like. Here's an example of a test that navigates and performs visual checks on a few views in the course of a basic functional verification:
This is what we want! Of course, there are a lot of rough edges here, which you would run into if you tried to build an entire visual testsuite on top of this mini "framework" we've developed. So don't forget to check out episode 2 in this little series on visual testing with Appium. Oh, and if you want to see the complete code example in the context of a working project, you can always find it on GitHub.
As it stands, the tests will pass, but that's because they're running against just one version of an app. To see the real power of this approach in action, you will of course need to run the test against multiple versions of the app, where the second version actually differs visually from the first!


-1280X720-Final-2.jpg)


